
How To Learn Anatomy With RemNote
Efficiently Master Human Anatomy


Sigh, Anatomy
No matter what you study at university, there is one universal truth about anatomy that you cannot evade: it is damn difficult. Whether you’re an aspiring orthopaedic surgeon or an ambitious physiotherapist, a solid foundation of anatomy is crucial for safe practice in most healthcare jobs.
It is essential for medical students to understand anatomical structures. Anatomy is directly relevant to the diagnosis and treatment of diseases; crucial invasive and non-invasive interventions rely on excellent anatomical awareness. Proficient anatomical knowledge aids in radiographic interpretation, and physical assessments of patients can only be effectively performed with a strong understanding of anatomy.
Therefore, if you’re a medical student who plans to specialise in a field where anatomy seems “not relevant” such as histopathology or microbiology, think again. On the other hand, if you wish to specialise in fields such as radiography or surgery, knowing anatomy is not helpful—it’s a prerequisite. Anatomy is everywhere; you will encounter it throughout your career, and there will be more than a few embarrassing moments when you cannot recall the correct anatomy and need senior help.
But let’s not think too far into the future. Consider where you are now, as a student. You need to learn the body’s basic musculoskeletal anatomical structures, their functions, attachments, innervations, locations, and more. There’s just one issue: there are about 600 muscles and 206 bones in the human body, and it’s unlikely you will be able to learn all of them in time for your exams.
Thankfully, you don’t need to learn all of them, particularly if you’re a medical student. Medical schools aim to train you to become competent clinicians. Consequently, most medical schools emphasise anatomy that is more relevant to day-to-day clinical practice. This doesn't mean you can skip learning anatomy for its own sake, but it does ease your burden by allowing you to focus your revision on the more clinically relevant areas of the body.
So, if you’ve read this far, you’ve already completed half the work. In this article, I will discuss some fundamental truths about studying anatomy, how to effectively study anatomy with RemNote, and how to make learning anatomy enjoyable rather than a chore.
Fundamental Truths
To approach learning anatomy in a healthy and effective manner, you must let go of the illusion that it will be similar to other high school subjects or even other medical school modules.
In reality, anatomy requires a specific approach, which I will outline later in this article, including how to tackle it with RemNote. But before you commit to this method, it's important to acknowledge some uncomfortable yet fundamental truths about studying anatomy.
Truth #1: Learning Anatomy is HARD
Are you familiar with the coastline paradox? Essentially, it shows how the length of an island’s coastline increases dramatically as you increase the precision of your measurements. For instance, if you measure Great Britain’s coastline using 100-kilometer units, the total length is about 2,800 kilometres. However, if you use 50-kilometer units, the length extends to approximately 3,400 kilometres.
I like to use this paradox as a metaphor for anatomy. At a surface level, you may think that learning anatomy is simply a matter of memorising the names and locations of muscles and bones. However, as you delve deeper into the subject, you realise that the complexity and detail of anatomical structures become increasingly intricate. Just like the coastline paradox, the more precise and detailed your study becomes, the more you uncover the nuanced relationships and functions of anatomical features.
Unfortunately, there doesn’t seem to be a limit to how in-depth you can study anatomy. As a medical student, you must accept that you are not aiming to co-write the next edition of Gray's Anatomy. Depending on your university, your primary goal is to develop a modest understanding and appreciation of the most clinically relevant anatomical structures, rather than mastering every detail.
Truth #2: Learning Anatomy Requires Consistency
Anatomy is not a subject you can master in a single study session. While you might be able to cram details about a class of antibiotics the night before an exam, this approach won’t work for anatomy. The sheer volume of information is overwhelming, and attempting to learn it quickly is not feasible.
Consistency is crucial. You need to engage in regular reviews and repetition to reinforce your understanding and retention of complex structures and their relationships. This means that even if you have no other time during the day, you must make time for anatomy.
Truth #3: Learning Anatomy Is Visualisation
Anatomy heavily relies on visual memory. Using diagrams, models, and images is essential for grasping the spatial relationships between structures. Effective study often involves frequent reference to visual aids such as anatomy apps or YouTube explanations.
If you can visualise a muscle, you'll also be able to recall critical details about its function and make educated guesses about its attachments and insertions. With enough practice, you'll develop an almost "X-ray vision" ability, allowing you to mentally see and understand the structures inside a patient as if by magic.
Truth #4: Learning Anatomy Is Understanding Before Memorisation
While memorisation is important, merely memorising names and locations is not enough. True mastery of anatomy involves understanding how different structures function and interact. A deeper comprehension helps in applying anatomical knowledge to clinical scenarios. With enough understanding, you'll start to recognise patterns in related structures, which will greatly ease the mental burden of memorisation.
Truth #5: Learning Anatomy Is Practical Application And Active Learning
Hands-on experience, such as working with cadavers or 3D anatomy software, significantly enhances your understanding. Practical application reinforces theoretical knowledge and helps solidify your grasp of anatomical concepts.
Always complete the prerequisite self-directed learning (SDL) work before attending an anatomy lab session if your university assigns you some. Make the most of your time in the lab by applying the knowledge you've already acquired; you should not be learning the material for the first time while you're there.
Revising Anatomy
I hope that by now, you have accepted the five fundamental truths about anatomy. If not, take a step back and re-read them. Otherwise, you will feel anxious and overwhelmed by the complexity of the subject.
If you’ve come to terms with the battle that awaits you, then now I will tell you exactly how to revise anatomy in a step-by-step fashion. This advice is discernible to any study workflow, so you don’t need to be a RemNote user. However, I highly recommend you use RemNote, and I will use RemNote to demonstrate all the points I make in this guide.
Step 1. Identify The Anatomical Division
The body can be split into multiple anatomical divisions, but it really depends on who you are asking. For medical students, it is important to know the most clinically relevant divisions:
Musculoskeletal Divisions
Head & Neck
Upper Limb
Lower Limb
System-based Divisions
Respiratory
Cardiovascular
Gastrointestinal
Genitourinary
Neuroanatomy
Brain
Spinal Cord
For the purposes of this article, we will discuss upper limb anatomy. Nonetheless, the following steps are applicable to all anatomical areas, with a few small differences here and there, which I will highlight.
Step 2. List The Anatomical Subdivisions
Once you have chosen a division, list all the anatomical subdivisions within that on a piece of paper (do not commit to any formal note taking yet). For upper limb, this would be:
Pectoral Girdle and Shoulder
Arm, Axilla, and Elbow (including Brachial Plexus)
Forearm and Wrist
Hand
If you’re unsure as to what the subdivisions for your area are, then don’t be afraid to use the internet or reference your medical school’s course structure as a rough guide. But remember that anatomy doesn’t change. Even if your course structure looks different to mine (pictured below), the actual learned content is all the same in practice.

Step 3. Choose A Subdivision To Revise
Unless you are already familiar with your chosen anatomical division, I strongly recommend focusing on studying one subdivision at a time. This approach ensures you build a solid foundation of knowledge before straining your mind further by mixing in other subdivisions.
Anatomy becomes significantly less mentally taxing when approached in a systematic manner. I find it easier to work subdivisions from top to bottom. So if you’re just starting your anatomy revision, begin with the more superior subdivisions and work your way down the body. Otherwise, simply revise the subdivision you feel is your weakest.
I will choose the Arm, Axilla, and Elbow as the subdivision this article will focus on. However, in the interest of keeping concise, I will solely focus on the Arm to demonstrate my points.
Step 4. Create An “Anatomical Window”
An Anatomical Window is a term I coined that represents two essential sides of any anatomical subdivision:
Anatomical Structures
Clinical Relevance
This window will help you visualise and appreciate the volume of information you will need to revise and how the anatomical structures directly relate to disease. You do not revise from a window; it is instead supposed to be used as a reference to lay a path for all future revision.
In order to create a window, simply take a plain piece of paper and split your page in half. The left side is for the main anatomical structures in your subdivision while the right side is for clinical relevance. Connect the two halves with arrows where applicable.
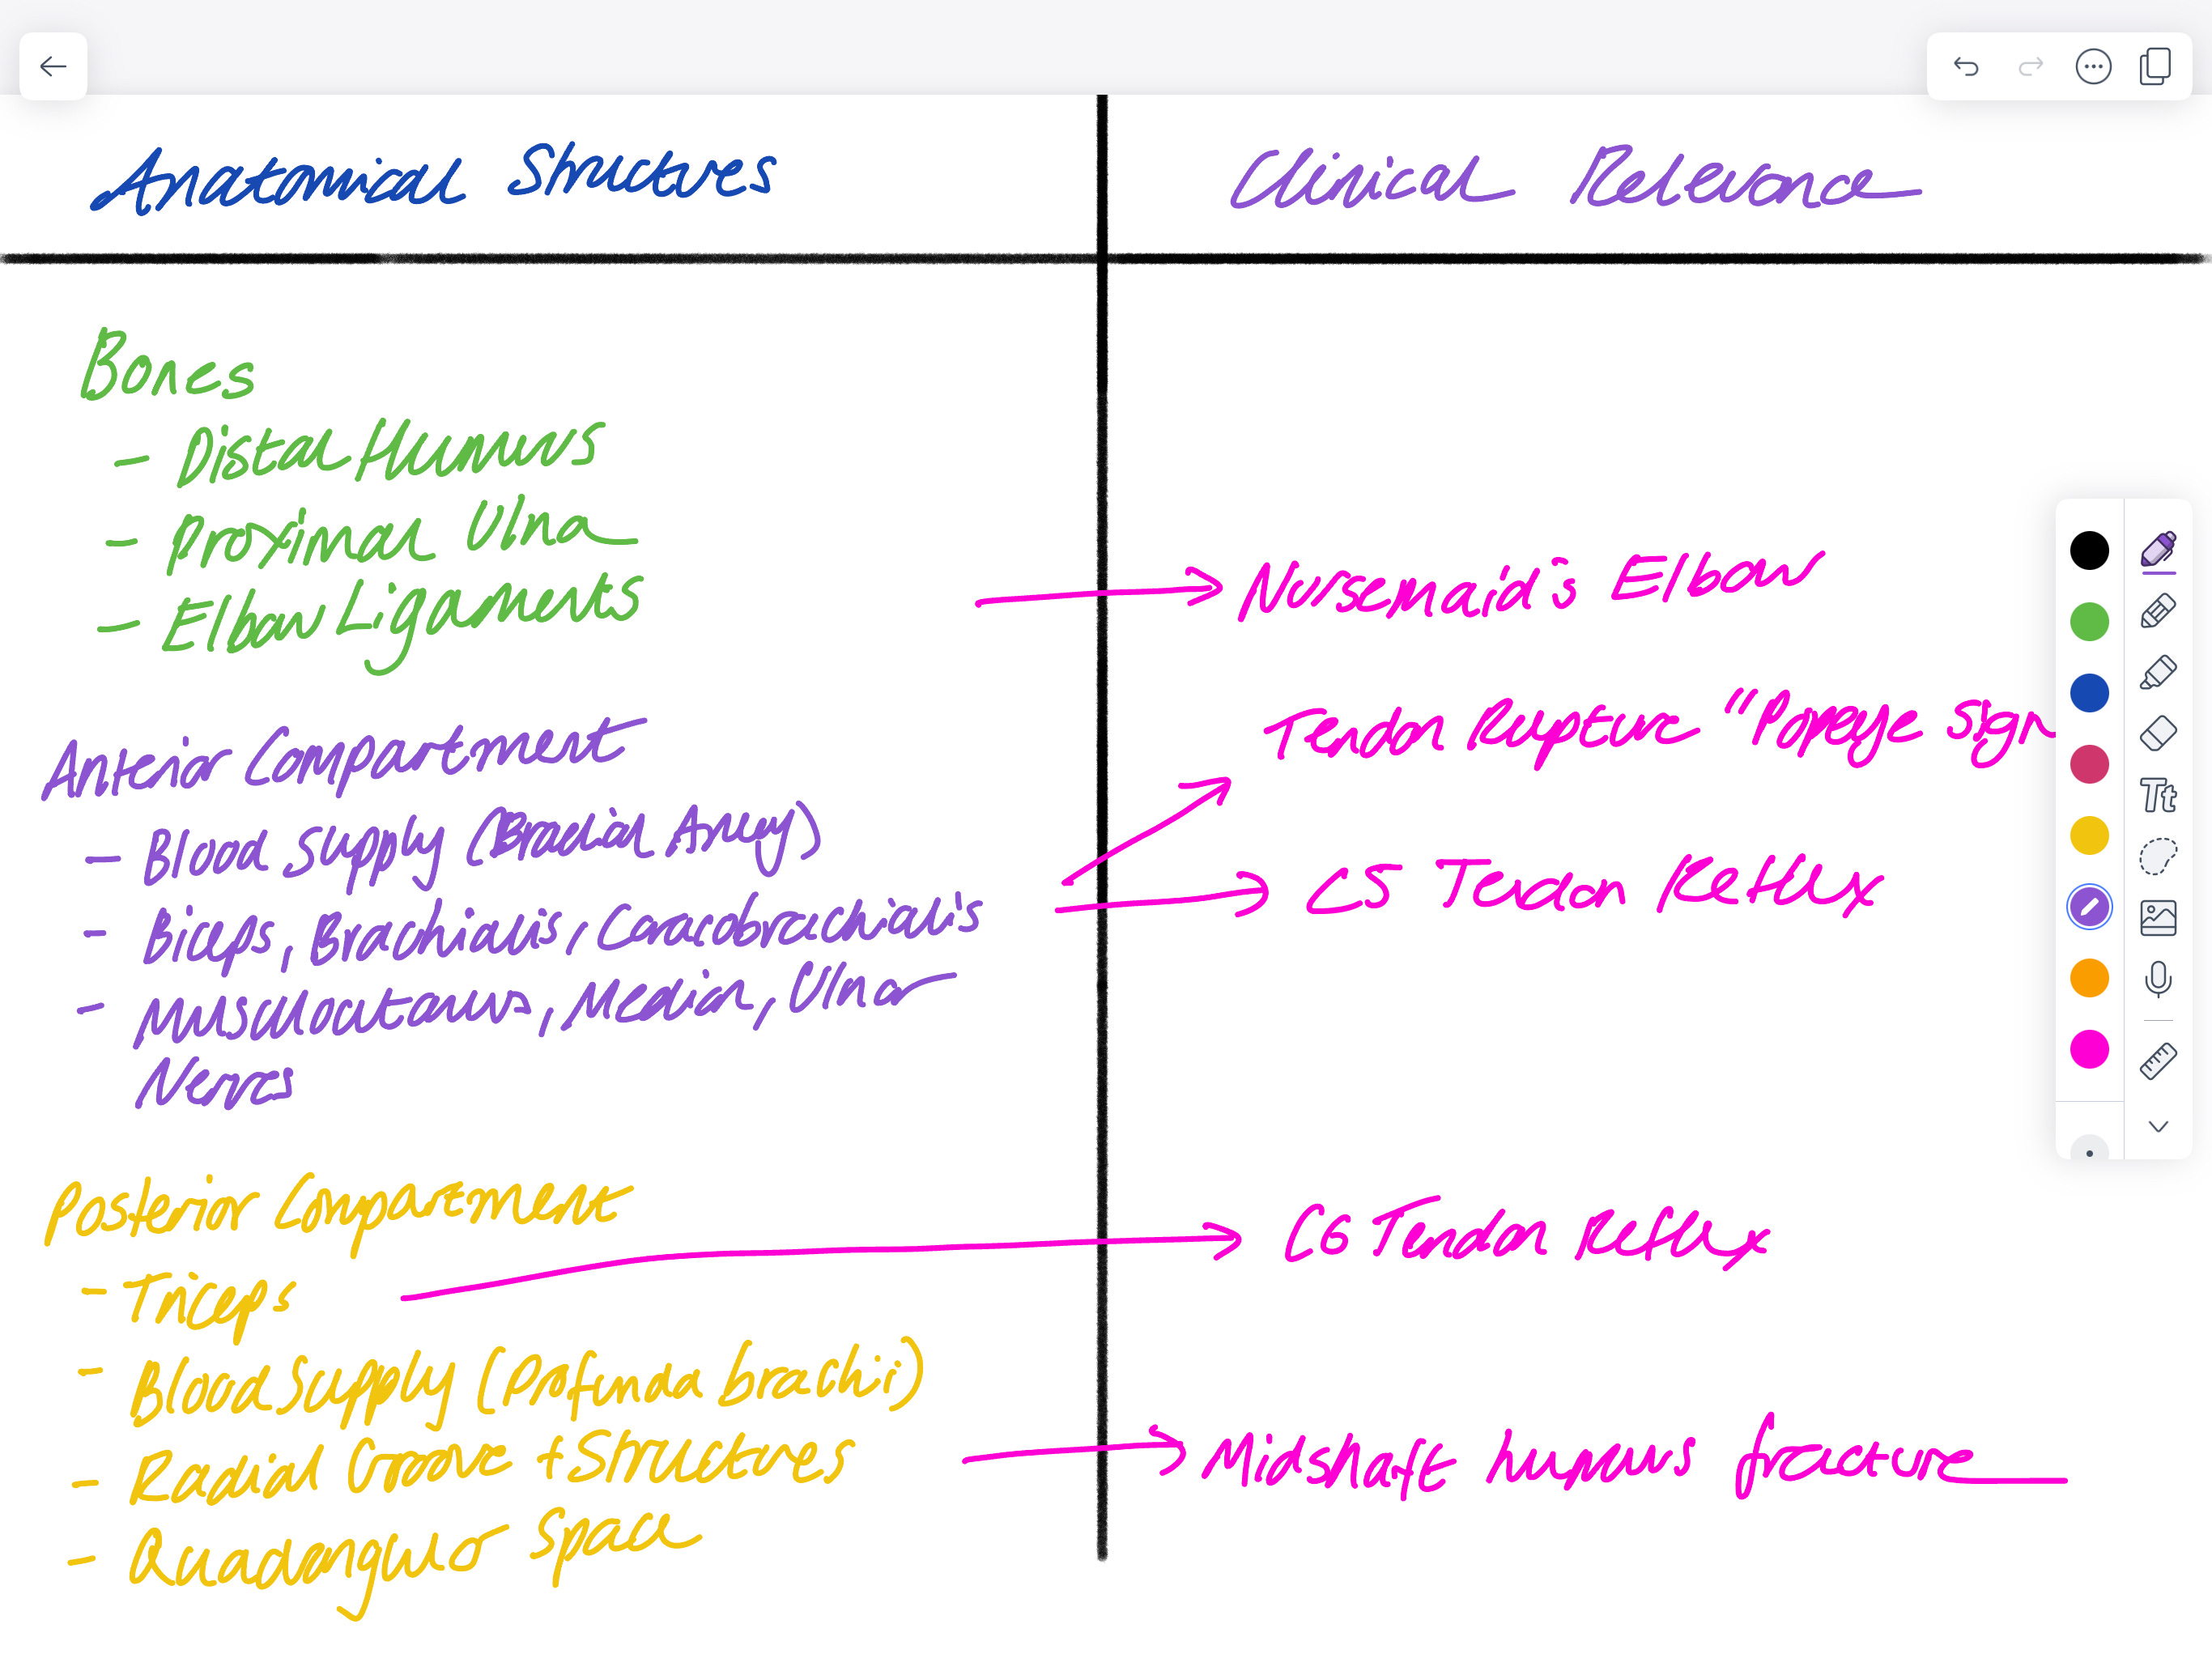
As you can see, your window does not have to be detailed, comprehensive, or neat at all. The window’s only purpose is to help you visualise your revision path forward and to see the picture as a whole, making anatomy revision feel like an interconnected discipline rather than mundane revision of standalone facts.
Step 5. Appreciate The Region’s Gross Anatomy
Before you start making notes or revising, it is vital that you can visualise your subdivision. This will help you become more familiar with the region, ensuring that the note-taking and revision stages stay focused.
The best part of this step is that it can be done in any way you prefer. You might look up images on Google or watch YouTube videos exploring the area. Personally, I like to use a 3D anatomy app.

Spend as much time as you want on this step. Pretend you’re a child again and you’ve just been gifted a fun and exciting book about the human body for Christmas. Read through it like you enjoy it—smile at the fact that you are fortunate enough to learn about this.
Step 6. Ask Yourself: “Do I Need To Make Notes?”
Taking notes in medical school has always been a controversial topic. On one hand, taking your own notes requires active engagement with the material, which promotes better understanding and retention. It also allows you to highlight areas you find challenging or particularly important. On the other hand, as I admitted in Step 2, "the actual learned content is all the same in practice." Therefore, one could argue that taking notes is a waste of time since other people, whether they be your colleagues from previous years or generic resources online, have already made comprehensive notes on the materials you study.
Nonetheless, I personally make my own notes. While the notes I find online and from my colleagues are excellent as standalone resources, they don't fully meet my needs. I need a note-taking system that adapts to my needs and my style. That's why I use RemNote for all my medical school notes, including anatomy. But this article is not about why I use RemNote or what makes it so great. Instead, I strongly encourage you to try it yourself using my referral link below.
Step 7. Understand The “Hardest To Softest” Rule
There is often a lack of clear direction on how to learn anatomy. To address this, I use the “hardest to softest” rule to guide my studies. As the rule suggests, you should start by studying the physically hardest structures and work your way to the more delicate ones. Begin with bones, then move on to muscles, followed by tendons and ligaments, and finally, soft tissues.
Step 8. Make Flashcards (+Notes) Starting With Bone
The best part about bones is their simplicity. There are relatively fewer nuances to grasp compared to muscles or soft tissues. Here are some of the core aspects of bone you should focus on:
Identify which bone is shown
Identify important bony landmarks
Identify which structures pass through or around important bony landmarks
Identify whether a left or right bone is shown
Be able to describe what kind of fracture is shown
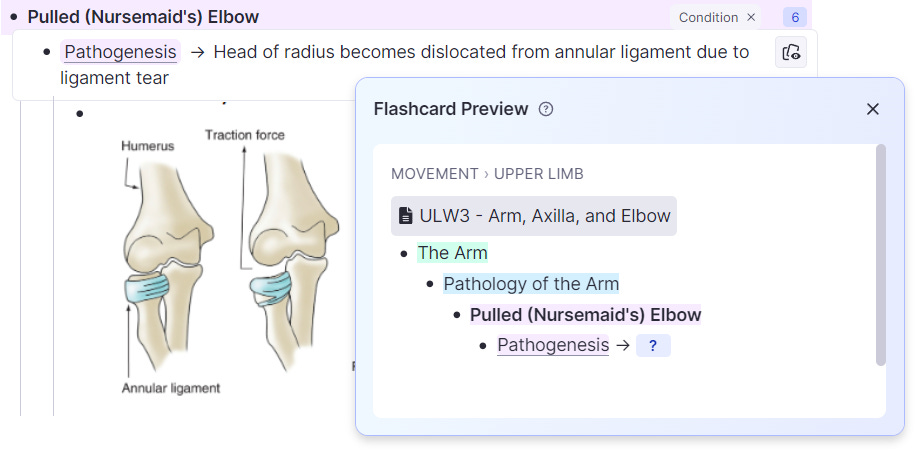
I find that the most effective way to learn about bones is to use image occlusion flashcards on images of bones found online or in anatomy textbooks.
With RemNote, creating image occlusions is straightforward. Just paste the image into your document, hover over it, select “Make flashcards from this image,” and draw boxes over the parts you want to hide.
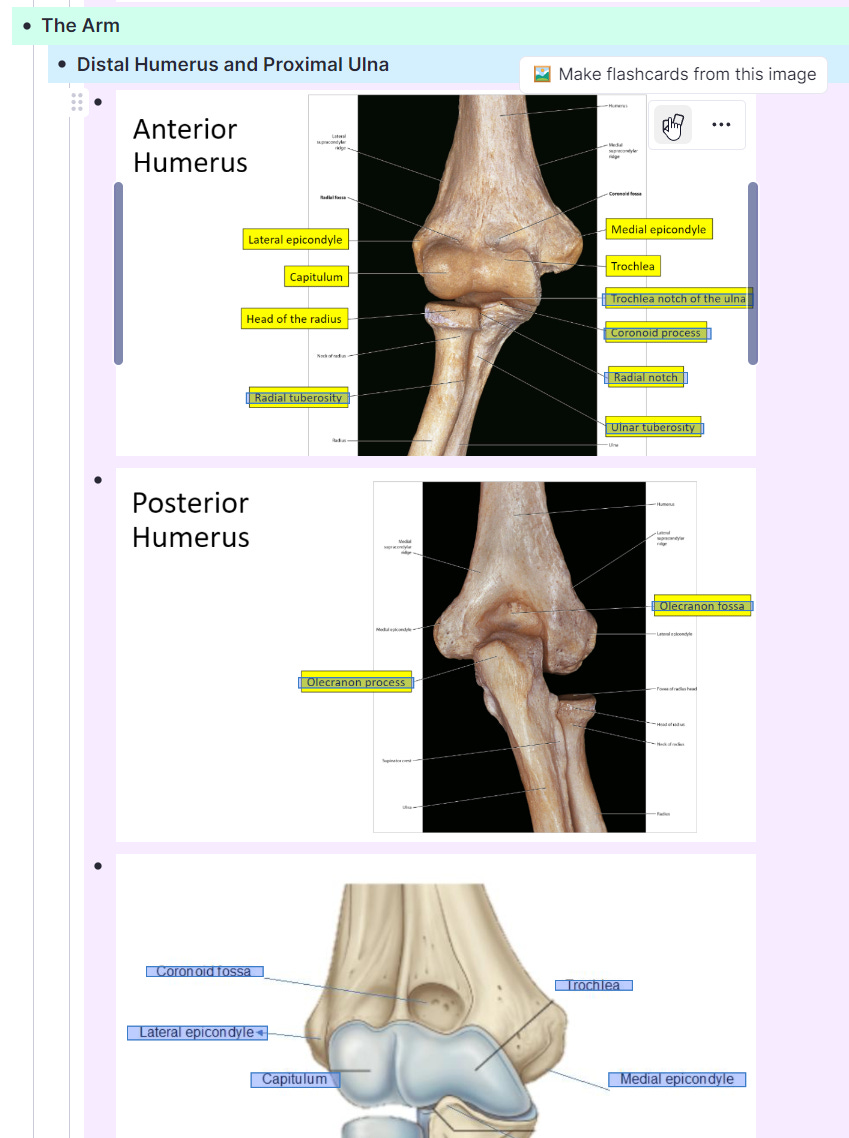
You really don’t need detailed "notes" on bones. Image occlusion flashcards are more than sufficient.
Step 9. Make Flashcards (+Notes) On Muscles
Muscles are a bit more challenging than bones. They’re harder to identify in cadavers, and their properties are broader and more subjective. This makes it difficult to stay ahead when studying muscles. Instead of trying to memorise everything, I recommend focusing on these core aspects:
Identify which muscle is shown
Know the attachments, actions, and innervations of muscles
Know which nerve lesions cause pathology in which muscles
Making notes on muscles involves a two-step process. First, just like with bones, you should create image occlusion flashcards from cadaver photos (avoid using idealised anatomical sketches).

In a real exam, the questions are unlikely to simply ask, "Which muscle is this?". Instead, they’re more likely to pose a longer question that requires you to work through a sequence of steps, with identifying the muscle being just the prerequisite task.
Secondly, you need to list and document all the properties of each muscle, such as its attachments and functions, in the form of flashcards. This step mostly involves copying information from existing sources, but the key is to ensure the content is organised and presented in a way that makes sense to you within your own RemNote notes.

Notice how I labelled all the muscles with the “Muscle” tag on RemNote? This allows me to apply the same properties to each muscle without re-typing them. While tags and their usage are beyond the scope of this article, I highly recommend exploring RemNote’s resources to learn how to use tags and properties effectively.
Step 10. Make Flashcards (+Notes) On Soft Tissues
There are no critical soft tissue structures in the upper limb, especially in the arm. However, if you were studying respiratory anatomy, for instance, this would be the perfect time to create flashcards for the lungs. Here are some aspects I recommend you focus on:
Know tissue function
Know tissue location and relationships
Know tissue histological features
Know tissue nerve and vascular supply
Be aware of the clinical relevance
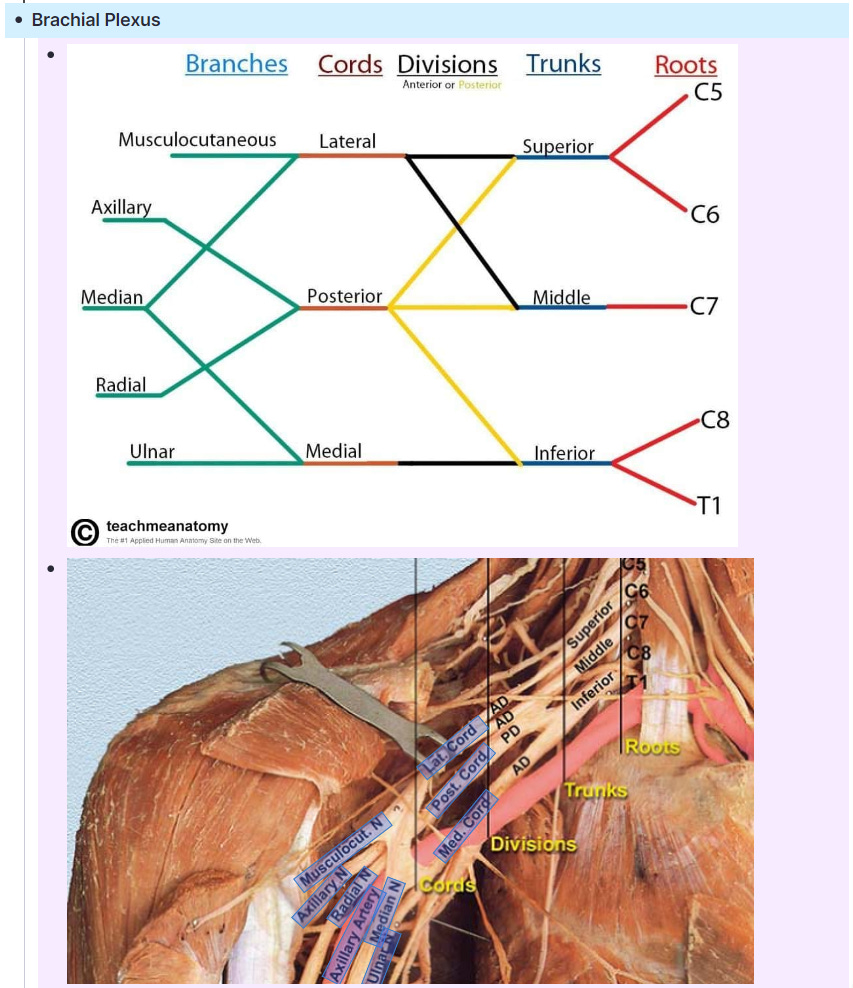
Additionally, this is an excellent opportunity to also tackle important neurovasculature, such as the brachial plexus and cutaneous innervations.
Step 11. Make Flashcards (+Notes) On Clinical Relevance
At the very bottom of my RemNote document, after listing all the raw anatomy I need to know, I include a section on clinical relevance (the right side of the Anatomical Window). You can organise this section however you prefer. I use a combination of standard flashcards and image occlusions.

Step 12. Appreciate Your Work So Far
If you’ve made it to this step, then well done! You’ve completed the most challenging part of note-taking. From here on out, most steps will focus on optimising your revision, which I consider the fun part.
Take a moment now and then to look back on the notes you've created and appreciate the effort you put into them. As you gain a better understanding of your course requirements, feel free to make small edits, but try to avoid altering the core structure or content.
Step 13. Do Your Anatomical Image Occlusions
It’s essential to start small and straightforward. I recommend beginning with your image occlusion flashcards (both bones and muscles). Having a solid grasp of gross anatomy will be a big help when you move on to revising muscular or soft tissue attachments and locations.

If you've created separate RemNote documents for each subdivision, like I have, I suggest using the "Practice All Flashcards in Order" feature to work through your flashcards sequentially.

If a non-image occlusion flashcard comes up, I simply skip it and focus solely on the image occlusions.
Step 14. Do Your Anatomical Muscle Flashcards
Once you've completed your image occlusions and have a solid grasp of the gross anatomy of the region, it's time to dive deeper and learn the attachments, actions, and innervations of the muscles you need to know. There's a significant amount of information to absorb, so follow the steps I've outlined carefully to ensure you never forget your muscle properties again.
I cannot stress enough how important it is to start by reviewing your muscle flashcards in sequential order. Typically, when practicing flashcards, RemNote will pseudo-randomise their order, which studies suggest enhances the brain's ability to connect ideas and promotes better active recall, thereby improving long-term retention.
While this approach is effective for most flashcards, learning muscles requires a different strategy. It's crucial to study them in sequential order when you’re just beginning as this will help you create a flow and recognise patterns. Here’s how you can achieve that with RemNote.

The First Practice
Firstly, select the group of muscles you want to study. For example, I’ll focus on the muscles of the anterior compartment of the arm, but you might be studying anything from the intrinsic muscles of the hand to the muscles of the posterior compartment of the thigh.
Since I have organised all my anterior arm muscles under a single parent Rem, I will now zoom into that Rem.

Once you’ve zoomed into the Rem, your page should display only the muscles you want to review. Click on the three dots in the top right corner, select “Flashcards,” and then choose “Practice All Flashcards in Order.”
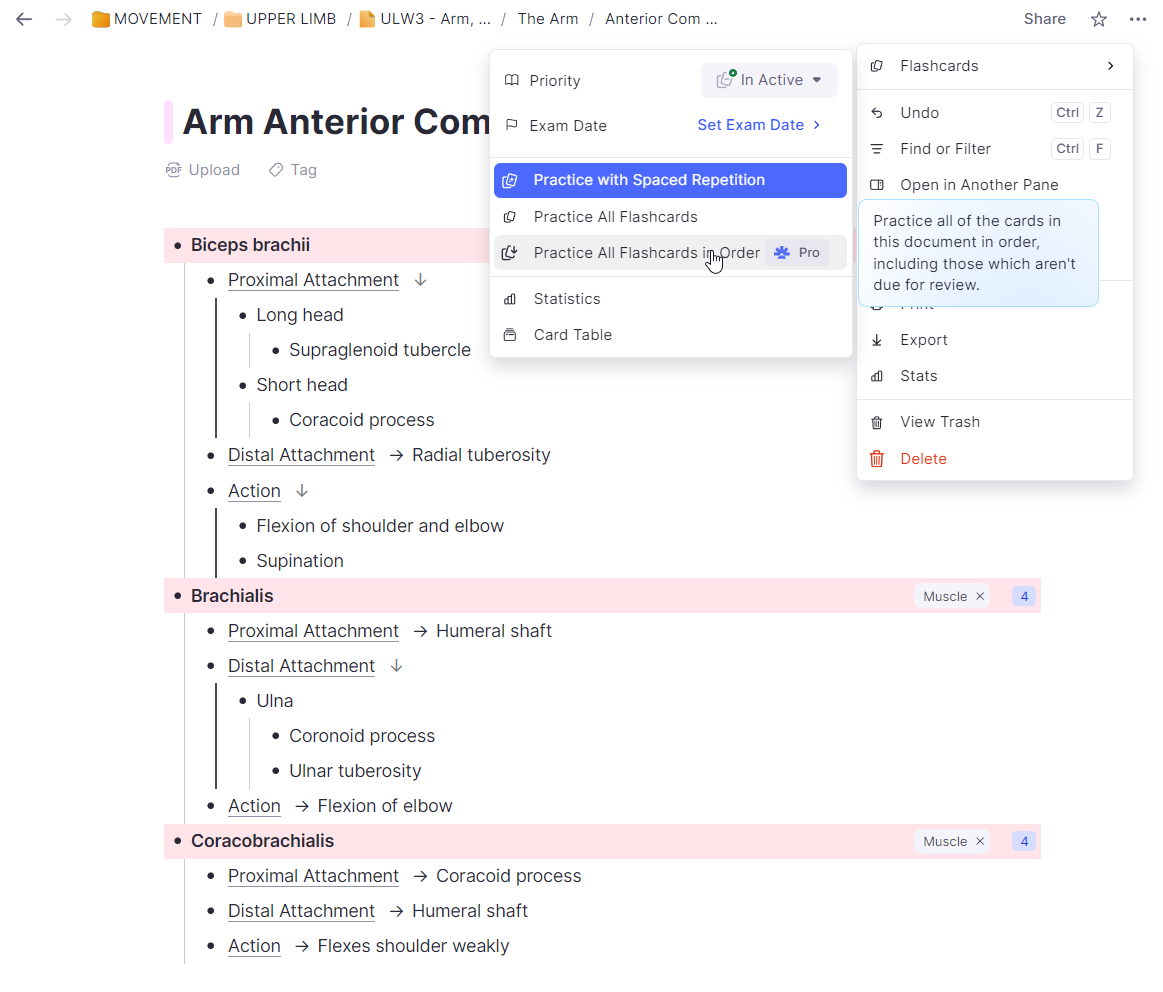
By now, you should be relatively comfortable with your muscle properties. At this stage, you don’t need to recall absolutely everything. This initial flashcard practice is simply to help you familiarise yourself with the information.
The Second Practice
Now, proceed with your second flashcard practice. Open the same flashcard menu, but this time select “Practice All Flashcards” (the second option). RemNote will present the flashcards in a pseudo-randomised order, making it more challenging but also enhancing your retention.
The Third Practice
After completing your second flashcard practice, take a break for a day or two. There's no need to cram everything at once. Return when you're feeling more refreshed and then proceed with your third practice.
The third practice is the most challenging so far. It involves writing down everything you know about each muscle from memory, without referring to your notes. This will be a true test of your recall, and it’s perfectly okay if you don’t get it right on the first try.
Here is my blurt for the anterior arm muscles. I recommend using abbreviations to save time while writing. The black text represents the muscle name, the green text indicates the proximal attachment, the blue text shows the distal attachment, the red text denotes the innervation, and the yellow text highlights the action.
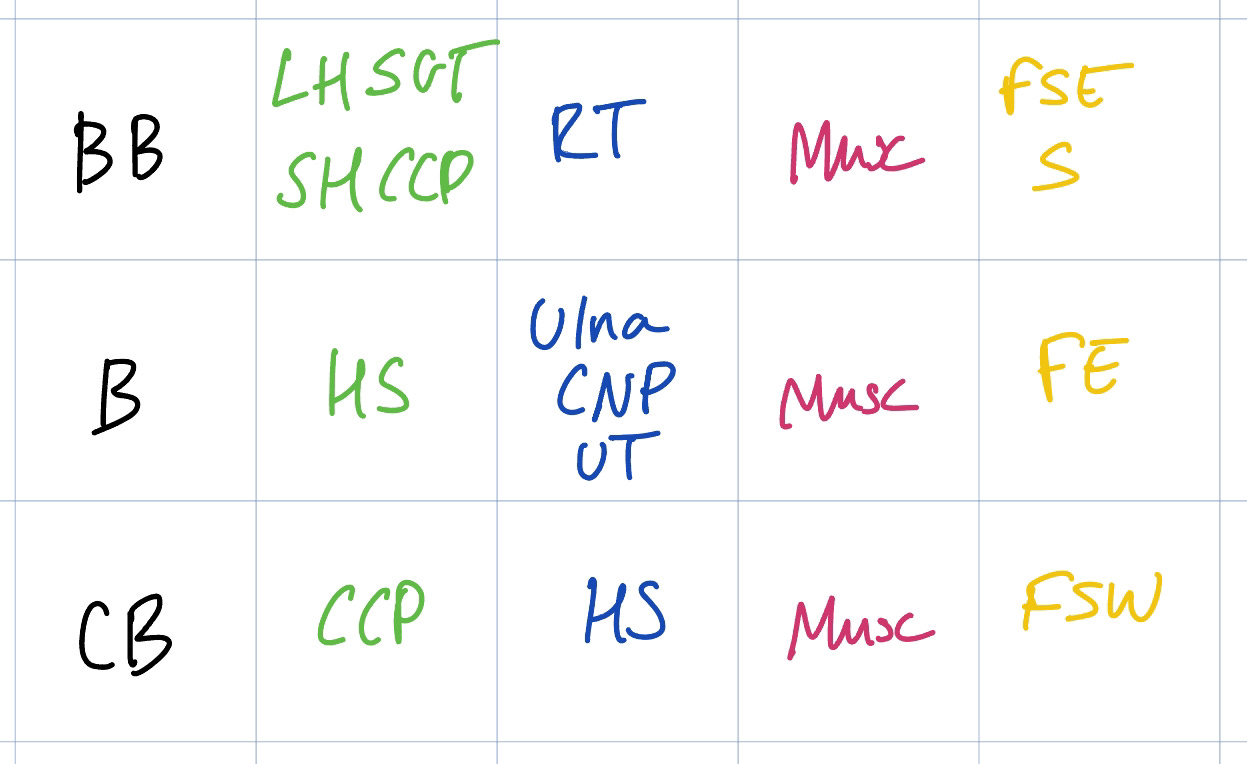
The purpose of the blurt is to consolidate what you’ve learned and apply any patterns you’ve noticed. What may initially appear as twelve separate facts can become much simpler when you identify these patterns. Here are a few examples:
All the muscles are innervated by the musculocutaneous nerve.
All the muscles function as flexors of the elbow or shoulder.
The coracobrachialis originates at the coracoid process, as indicated by its name.
The humeral shaft serves as both a proximal and distal attachment.
Recognising these patterns can eliminate 8 out of the 12 standalone facts, making memorisation significantly easier. There are many such patterns throughout the body, and it’s up to you to identify and leverage them.
Repeat All Three Practices Consistently
To really get a handle on the material, you need to repeat all three practices regularly, and that’s where spaced repetition comes in. Start with your image occlusion flashcards to nail down the basics. Then, move on to the pseudo-randomised flashcards to test your recall and make sure you’re really absorbing the info. Finally, hit up the blurt practice to see how much you can remember and apply without peeking at your notes.
Make sure to space out these practices over time. Regular reviews, spaced out in increasing intervals, will help you keep the information fresh and tackle any tricky spots you might have missed. By sticking to this routine, you’ll build a solid understanding.
Step 15: Do Your Soft Tissue Flashcards
Now that you’ve got a solid grip on bones and muscles, it’s time to tackle the soft tissues. Soft tissue anatomy, like the structures in the respiratory system or the abdominal organs, can be a bit trickier because there are fewer clear-cut visual markers. But don’t worry, with the right approach, you’ll handle this just fine. I recommend following a similar revision pattern to your muscles. Do your flashcards in order, then pseudo-randomised, blurt, and repeat.
Step 16. Do Your Clinical Relevance Flashcards
Next up, tackle your clinical relevance flashcards. These are crucial for connecting your anatomical knowledge to real-world situations, so make sure you review them regularly.
There’s no special technique here—just make it a habit to go through these flashcards often. As you do, focus on understanding how each one ties back to the anatomy you’ve studied. This helps you see how your knowledge applies in clinical scenarios and ensures you’re not just memorising but truly grasping the material.
Keep these flashcards in your regular study rotation. The more you review them and relate them to your anatomical understanding, the better you’ll be at linking theory with practice. This step is all about reinforcing those connections and preparing yourself for real-world application.
Step 17: Do Practice Questions Daily
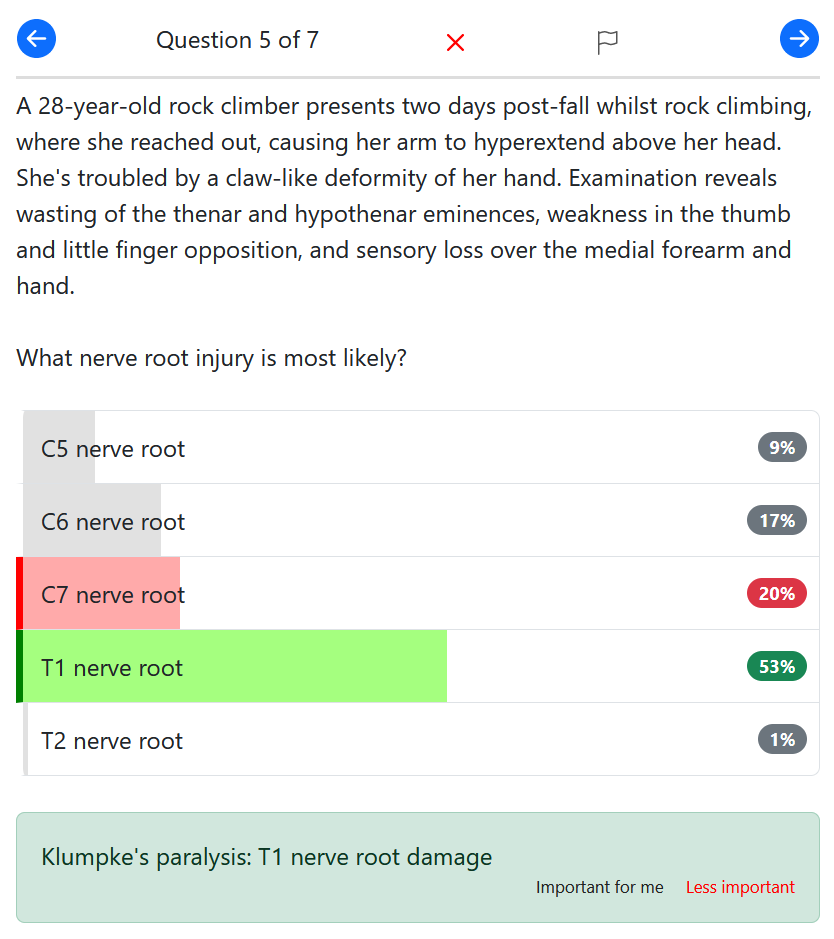
Add some fun to your study routine by tackling practice questions every day! They’re a fantastic way to test your progress and keep your knowledge sharp. Make it a habit to set aside time each day for these questions—they help you apply what you’ve learned and pinpoint areas that need a bit more attention. Plus, seeing your progress in action can be really satisfying and a great break from your usual flashcard routine.
Medical School Provided Questions
These are often the best and more relevant questions for you to practice with, as can be almost certain that similar styles of questions will appear in your exams.

PassMedicine
Incorporate practice questions from PassMedicine too, especially if you are a UK-based student. PassMedicine is a tried and test question bank that contains hundreds of high-quality and clinically relevant questions.
Step 18. Relax
Congratulations, you’ve made it to the end of the article! You’ve got all the tools and strategies you need to master anatomy. Take a moment to appreciate your hard work—you’re on your way to acing it. Keep pushing forward, and remember, you’ve got this!
You’re Done!
Well done! You’ve made it through the whole guide, and now you’re set up to tackle anatomy like a pro. Remember, mastering anatomy isn’t about cramming but about steady, consistent work and smart study strategies. Keep using RemNote to stay organised, and don’t get discouraged if it takes time to get everything down. You've got the tools and tips you need, so trust the process, stay focused, and remember: you’ve totally got this!